git-workshop
Git basics
| Is this section core or elective? | Expected time to completion |
|---|---|
| core | before third meeting |
Introduction
Git is a free, open source, distributed version control system for files. Git can track, store and merge changes on files. Thereby Git allows to recover older versions of the files tracked. Moreover, multiple developers can work on different versions (branches) of the files, share their work among each other, and merge their changes into a joint version. All these functionalities make Git a strong tool for software development in teams.
For further reading on why to use Git, consult Atlassian’s “Why Git” or GitLab’s version-control pages.
Objective
This chapter introduces the basics of Git. To do that, the two objects repository and commit are explained. Moreover, the basic Git commands are introduced, allowing you to initialize a new Git repository, add and commit files and changes, as well as retrieve older versions of files. Within the scope of the Git basics training, we focus on operations performed locally on your machine. However, a local Git repository can also be connected to a remote repository, which is hosted in the internet or on a server in your network. The concept of a remote repository will be explained in the Git advanced and the Git expert sections.
Repository
For each folder under git control, the repository can be found in a hidden
directory .git which is created automatically when initializing a new Git
repository. It contains configuration files, information about the tracked
files, your commit history, and more.
The files next to the .git folder are the files under version control, also
called checkout or working directory. When using git, users usually do not
need to access this folder directly; rather, they interact with it through the
git application.
Each Git repository has a so-called index, which is a staging area where
changes are collected before they are committed. The index of a Git repository
can also be found in .git.
Optionally, git can be told to ignore certain files and folders, or all
files/folders with a specific name pattern, in the repository’s directory.
In order to do so, a text file called .gitignore containing a list of the
files/folders to ignore has to be stored in the repository’s root directory.
Ending the name with a backslash identifies the object to be ignored as a
directory instead of a file.
Example for a .gitignore file:
# ignore a file which is called "file_to_be_ignored.txt"
file_to_be_ignored.txt
# ignore all zip files as well
*.zip
# ignore a directory (and all its content)
directory_to_be_ignored/
For more details on .gitignore see the
respective section on the official Git homepage.
Commit
A commit is a snapshot of the current changes to the files in your repository. Each commit has a unique commit id (a.k.a. commit hash), as well as a reference to its parent commit. The collection of all commits represents the history of all the changes to a repository. They tell you how your repository came to be the way it currently is. Therefore, the commit is the fundamental object of a version control system.
Staging and creating a commit
While you are working on the files in your working directory, you can stage changes, which means that you add the changes to the index of your repository. Note that only the changes in files you specify are staged. This process of staging changes on files prepares your next commit.
When all changes intended to go into the next commit have been staged, you can create the next commit. By doing this, a new commit object is created in your repository containing all staged changes. Notice how the index thus enables you to commit only a part of the changes you made should you wish to do so. Moreover, the current commit is set as parent of the new commit and the new commit is set as the current commit.
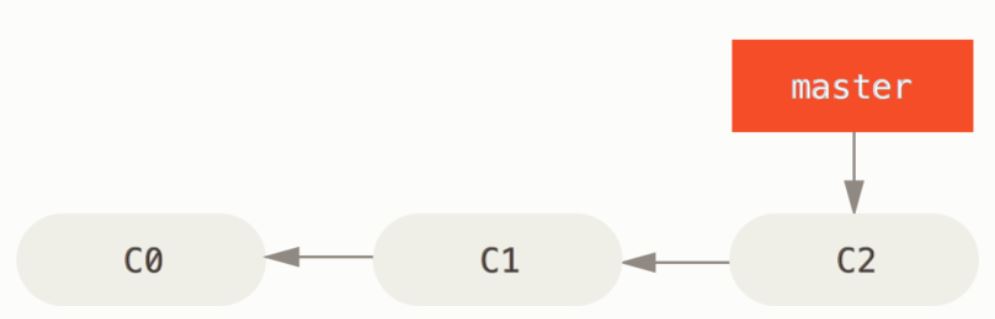 source:
https://book.git-scm.com/book/en/v2/Git-Branching-Basic-Branching-and-Merging
source:
https://book.git-scm.com/book/en/v2/Git-Branching-Basic-Branching-and-Merging
Simple commit history with commits C0, C1 and C2
How Git stores your files
At lowest levels, Git keeps track of your data using four fundamental objects: commits, trees, blobs and annotated tags which in the following will be explained in more detail.
The contents of the files in your repository are stored as blob objects in
.git/objects where each file can be identified by its own
SHA-1 hash.
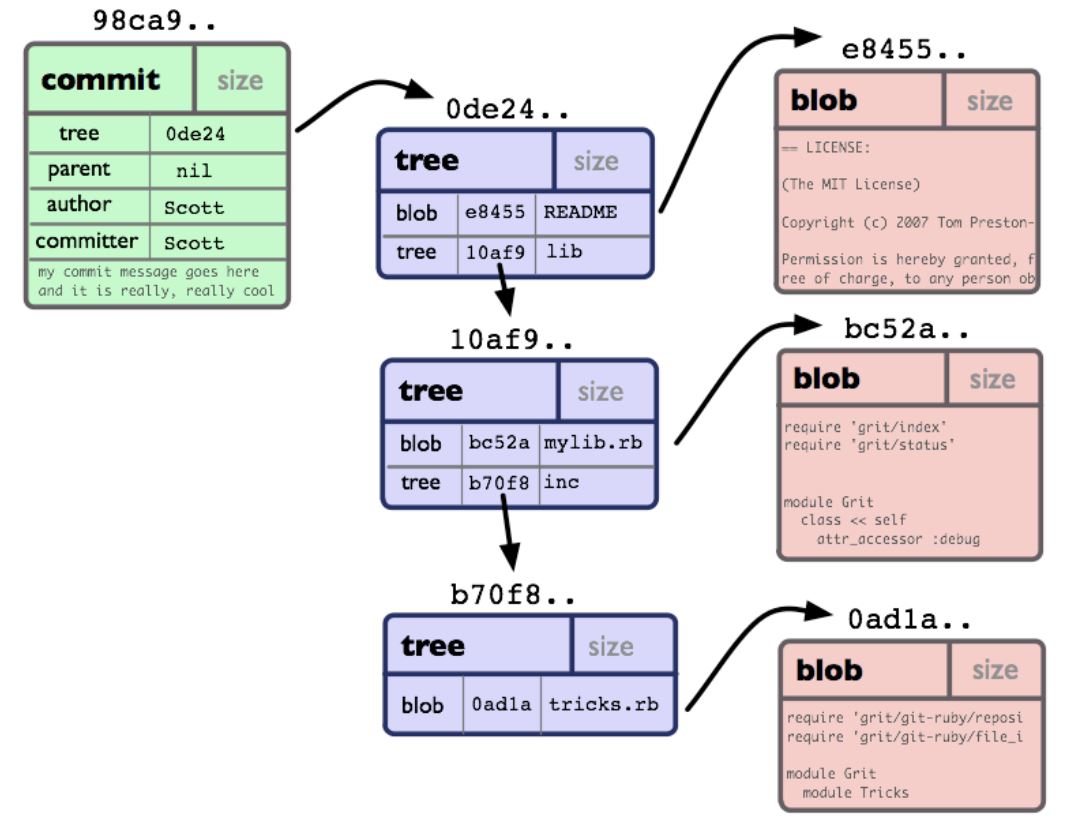
When creating a commit, a snapshot of your current working directory is taken. What Git does is to create a commit object of the so called tree data type. In this tree, every leaf is the SHA-1 hash of a blob object of one of the files considered in this commit. A tree represents a directory in your working directory, and therefore, the leaf of a tree can also be another tree.
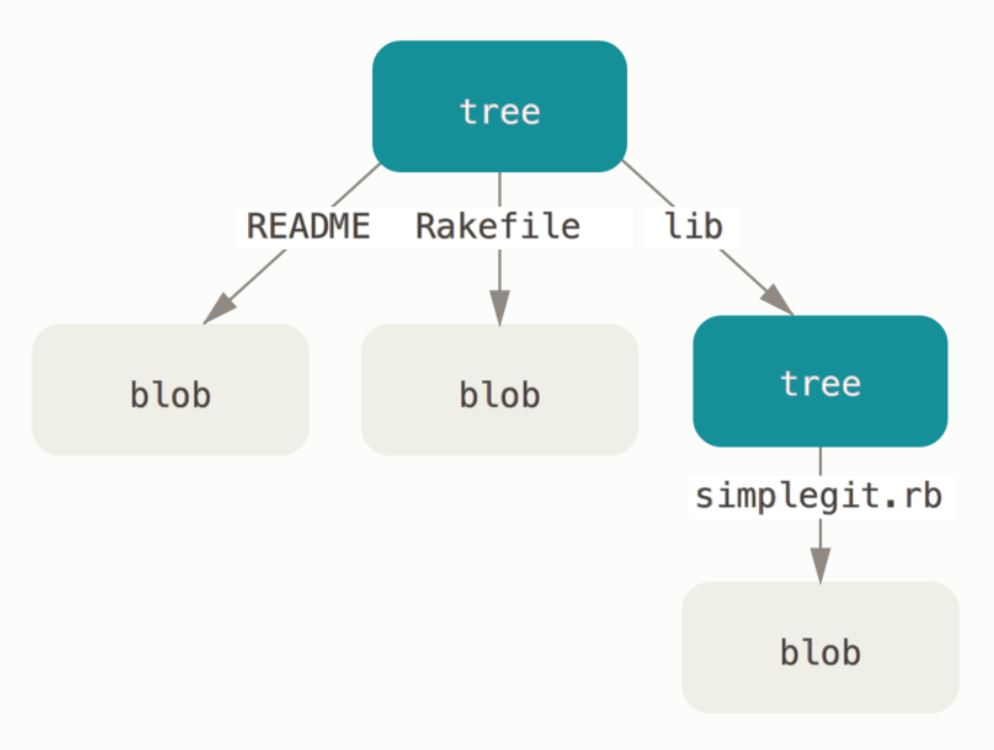 source: https://git-scm.com/book/en/v2/Git-Internals-Git-Objects
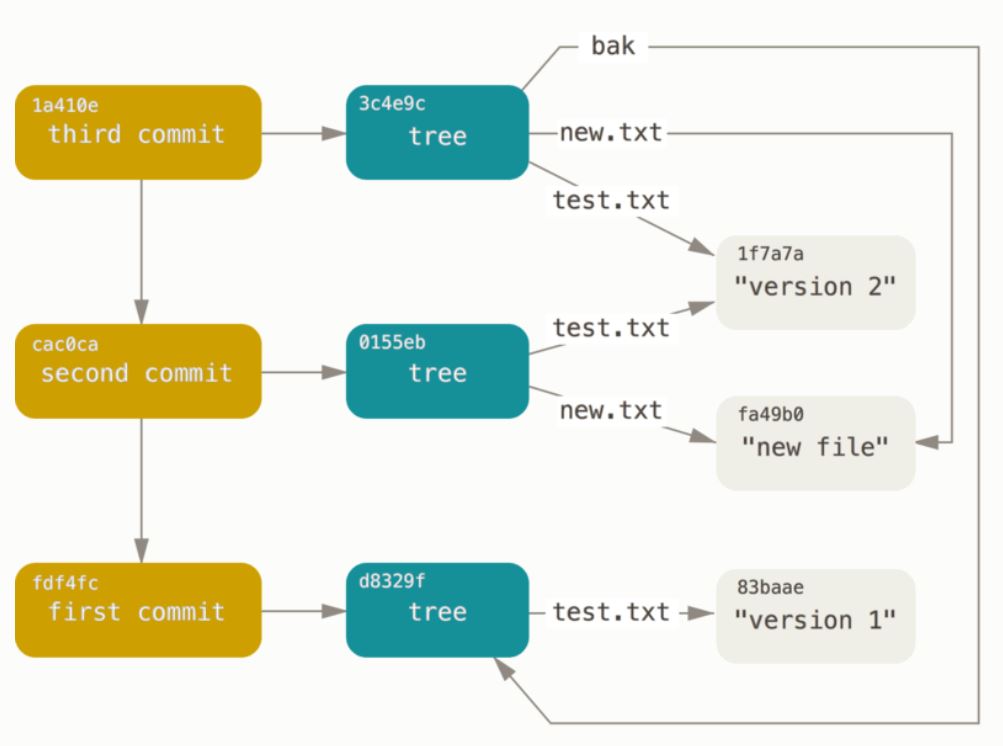
Eventually, each commit object stores the SHA-1 hash of the respective top level tree as well as the SHA-1 of its parent commit object.
 source:
https://git-scm.com/book/en/v2/Git-Internals-Git-Objects
source:
https://git-scm.com/book/en/v2/Git-Internals-Git-Objects
 source:
http://shafiul.github.io/gitbook/1_the_git_object_model.html
source:
http://shafiul.github.io/gitbook/1_the_git_object_model.html
source: https://git-scm.com/book/en/v2/Git-Internals-Git-Objects
The repository’s index contains the file names and corresponding SHA-1 hashes, in order to establish the link between file names and their underlying blob objects. When a commit is created, the index is used to write the new tree object, as it contains all staged files. The index allows for a fast comparison of a tree object with your current working directory.
Note, that all identifiers which ultimately point to a tree object are also called tree-ish, e.g. a commit, since it points to the root directory of your project. The same logic is sometimes used for identifiers ultimately pointing to commits, which are then called commit-ish, e.g. a tag. Hence, an identifier which is commit-ish is by definition also tree-ish.
tag -> commit -> project-root-directory
Git offers the ability to tag important commits in the commit history. A common use case for tagging is to mark the release points of your software. Doing so, Git differentiates between lightweight tags and annotated tags, where lightweight tags can be considered as branches which never change and annotated tags are stored as full objects in your Git database, i.e. including an optional tagging message.
For more details on the different Git objects, you can read the Git Internals - Git objects section.
Commands in Git
Basic Git commands
In the following, some of the most important Git commands are introduced. The explanations given here are very basic. More details, especially on the available options, instructions and examples on how to use them, as well as further commands not listed here, can be found in the official Git documentation. Text in angle braces <> is meant to be replaced by your desired text.
-
git config
Configures Git, sets a username, an email adress, etc. -
git init
Initializes a Git repository in the current working directory; creates a new, empty repository. -
git clone <repo-uri>
Clones an existing repository into a new directory, sets remote-tracking branches to the cloned repository, checks out an initial branch. -
git status
Shows the current status of the Git repository, e.g. the currently checked out branch, untracked files, unstaged changes to files, staged files which have not yet been committed, and commits which have not yet been pushed to the remote repository. -
git add <file0> ... <filen>
Adds changes to your Git repository’s index, in other words, stages changes. This is required before creating the next commit since only staged changes go into the next commit. -
git reset
Unstage all staged changes. -
git commit
Commit staged changes. A new commit is created with all changes taken from the repository’s index. A unique commit ID and a reference to its parent commit are created. Git attaches a “commit message” to the commit. If you do not specify it on the command line, the default editor (usuallyvim) is opened - sometimes with an automatically generated commit message, for example after a merge - allowing the user to write the message. The commit message is attached to the commit. A commit message can also be given using the-m "too lazy to write a good message"option - this is not recommended as it encourages messages which are worthless for anyone trying to understand the history of some code. The git documentation provides a template for the format of a good commit message, though without an example. Good commit messages save hours of the time of anyone working with your code. However, in this training, there is not much that can be said for any commit and we will not review commit messages. -
git checkout <repo>
Update the files in your working directory to match the version in the repository<repo>’s index. -
git log
Show the history of commit logs including the commit ids, the commit messages as well as the author and the creation time of the commit. There are a number of options to customize the format and how the output will look like. In order to get a graph-like visualization of your branches and commits you could use e.g.:git log --oneline --all --graph --decorate
Exercise
Remember to hand in a file with your bash commands as described in how to submit solutions.
Prerequisite: Git installation including the Git-for-Windows bash (instructions to be found here).
- Configure your Git installation in order to set up your username and email address. Remark: Afterwards, you can use the commands
git config --list | grep user.name
git config --list | grep user.email
to check if the username has been set correctly. They should return the values you previously set.
- Create a new folder
myReposomewhere on your hard drive and initialize a new repository inside this new folder. Remark: Use the commandls -ato see the hidden.gitfolder, and thereby check if your repository has been initialized. You can browse the contents of that folder and see the different files it contains. - Create two empty text files,
myFile_1.txtandmyFile_2.txt, stage the files and create your first commit containing both files. It is strongly suggested to write commits in imperative mood. Hint: When committing, use the option-mwhich lets you set your own commit message (for further details on how to use this option see the official Git documentation). Remark: Use the commandgit logto see your first commit. - Commit at least three different versions (that means, two additional
versions) of these two files using meaningful commit messages.
Remark: Regulary use
git statusto check the status of your repository, e.g. before changing files, after changing but before staging the changes as well as after you staged your changes. - Retrieve the very first committed version of your file
myFile_1.txt, the one when the file was empty. Hint: Look forgit checkout <tree-ish> <pathspec>in order to load previous versions of your files into your working directory as well as into your index.
Goal: This exercise can be considered successfully completed when the command
git log shows at least three commits and your working directory contains the
first, empty version of myFile_1.txt and your last version of myFile_2.txt.
Further reading
- Official Git hompage, with documentation, downloads and access to the Git community
- Official Git homepage - .gitignore